It’s 5 PM. The game starts in three hours. You’re staring at the empty fridge, the TV is blaring pre-game shows, and you have absolutely zero plan for dinner. I’ve been here. I’ve been there. I’ve even stood in that exact spot holding a bag of frozen nuggets, contemplating a surrender to takeout.
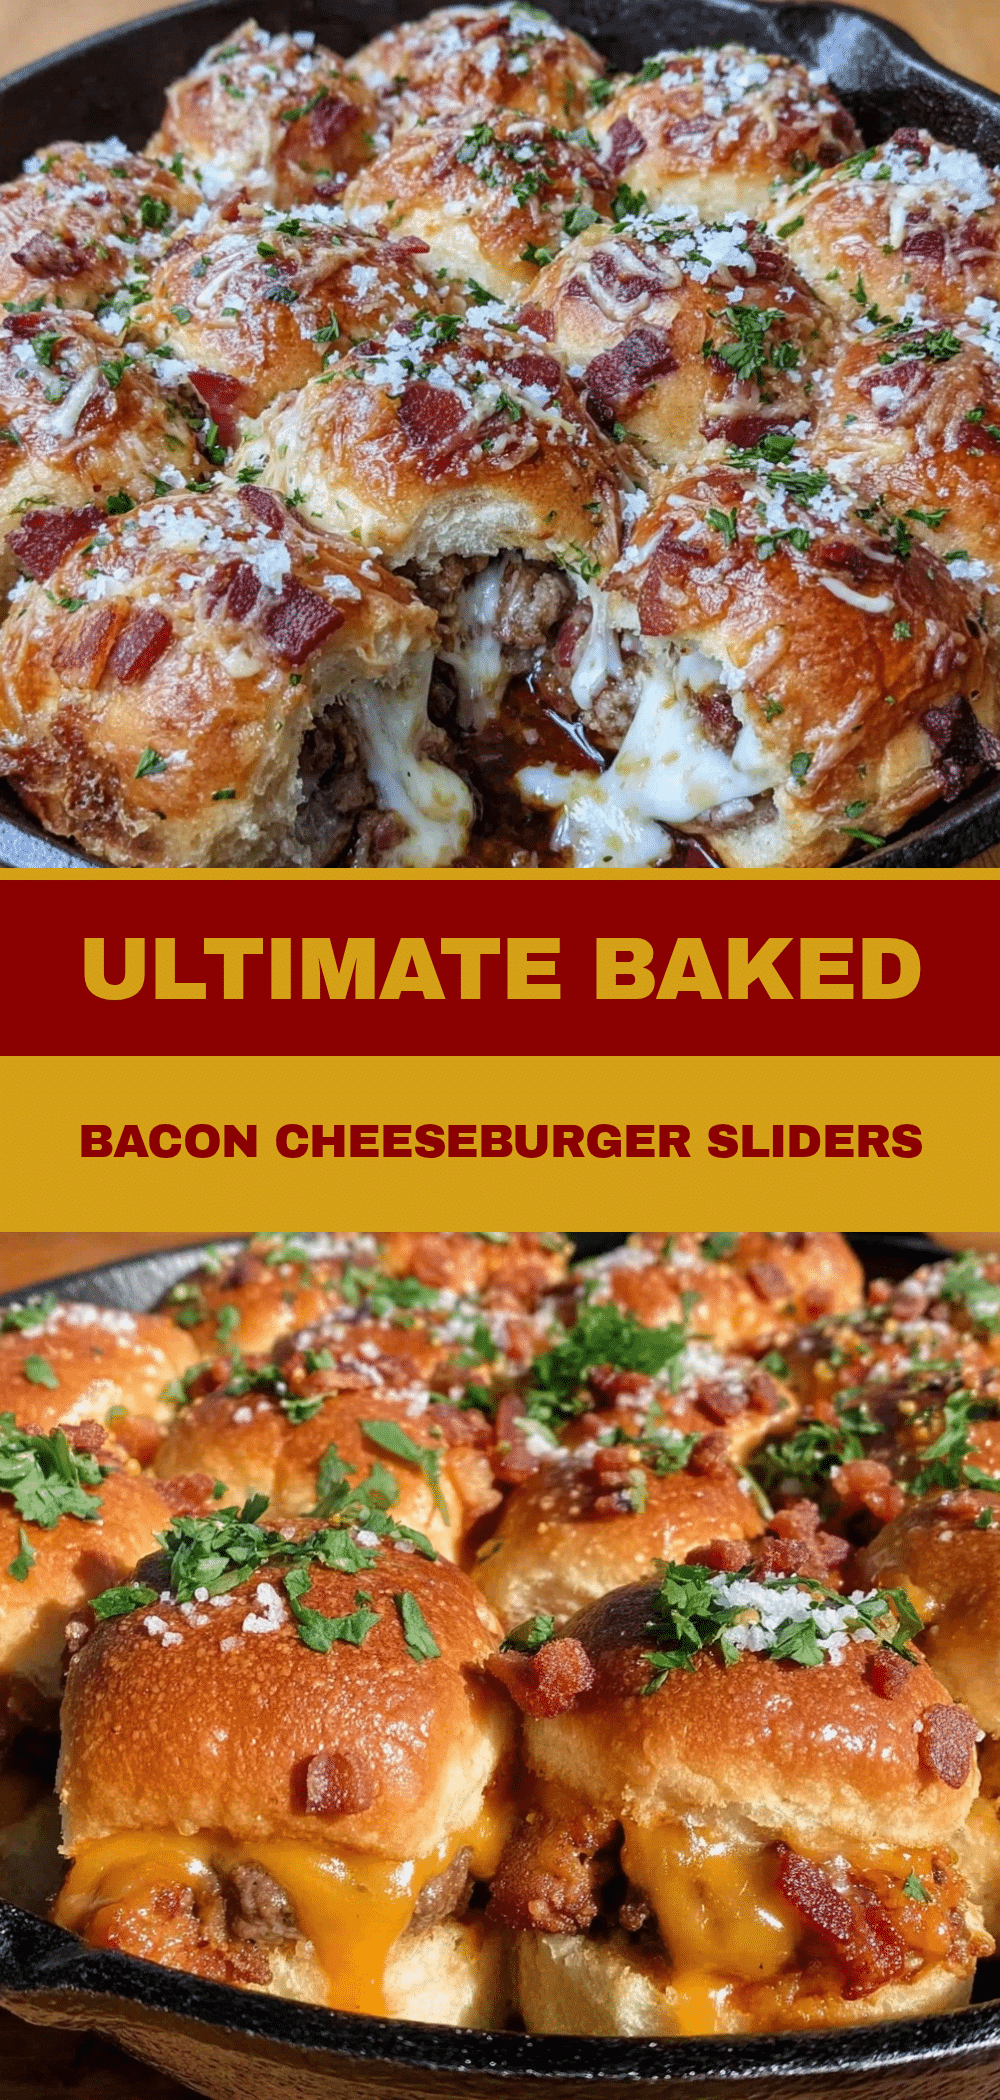
But last Sunday, right before the big game, I refused to let the day be ruined by mediocre snacks. I had a block of ground beef, a pack of bacon, some American cheese, and a bunch of Hawaiian rolls. I threw them together with zero expectations, and within 30 minutes, my living room smelled like a high-end burger joint. By halftime, the platter was empty. My friends were asking for the recipe before the second quarter even ended.
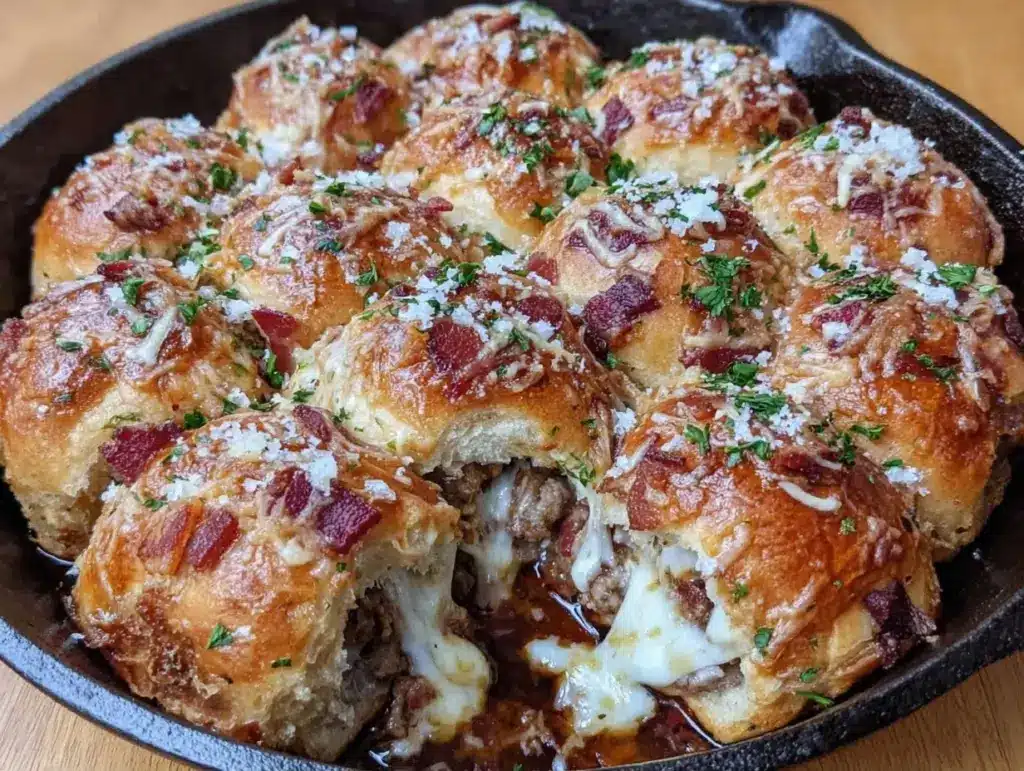
That’s when I knew I had a winner. These Game Day Bacon Cheeseburger Sliders are the ultimate 5 PM win. They’re messy, they’re indulgent, they’re ridiculously easy, and they disappear faster than you can say “touchdown.” I’ve made this batch at least a dozen times since then—sometimes for game day, sometimes just because I wanted comfort food on a random Tuesday. And let me tell you, these sliders are the answer to “what’s for dinner?” when you’re tired, broke, and hungry.
If you’re looking for a crowd-pleaser that doesn’t require a culinary degree, stop scrolling. You need to make these. Seriously. They’re better than ordering pizza, they cost less, and they taste like you spent all day in the kitchen (even though you didn’t).
Why You’ll Love These Bacon Cheeseburger Sliders
Here’s the thing about party food: it’s usually either too fancy to eat comfortably or too boring to remember. These sliders hit that sweet spot of “finger food heaven.” I’ve tested this recipe with everything from picky kids to my husband’s football-bro friends, and the verdict is always the same: “Make these again.” Here’s why they’re my go-to for any gathering.
Zero Stress, Maximum Flavor
You don’t need to be a chef to pull this off. I mean, if you can boil water, you can make these. The process is straightforward: cook the meat, toast the buns, assemble, bake. That’s it. No complex techniques, no weird ingredients you have to hunt for at 5 PM. It’s just solid, savory, cheesy goodness.
The “One-Pan” Magic
I love recipes that don’t leave a mountain of dishes in the sink. With these sliders, you’re mainly using one skillet for the meat and one baking dish for the assembly. Maybe a cutting board and a knife. That’s it. The cleanup takes about five minutes. I can actually relax during the game instead of running to the kitchen every time the commercials come on.
Crowd-Pleaser Status
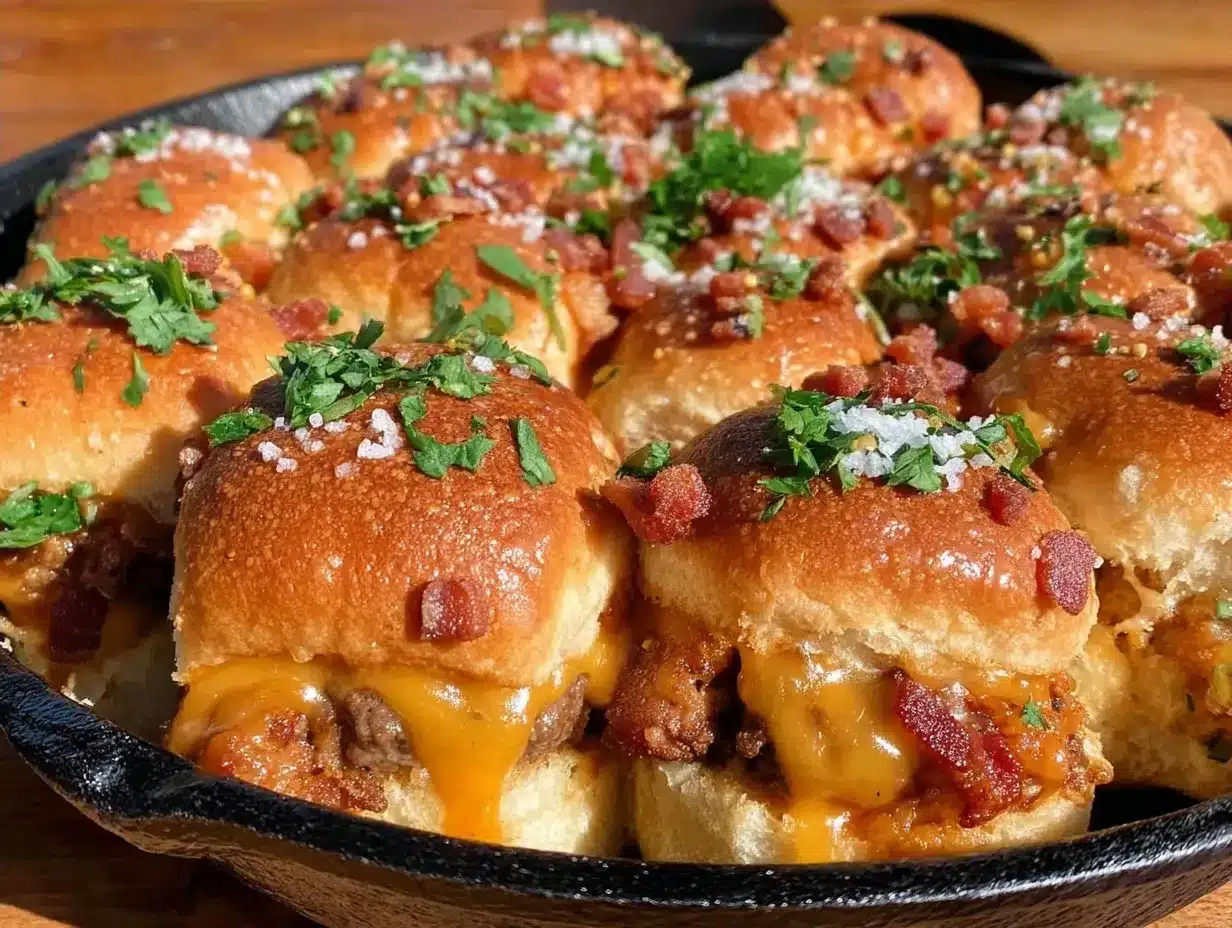
Whether you have vegetarian guests (who can just skip the meat and grab the cheesy bun bits, no judgment) or carnivores who want every ounce of beef, these work. I’ve served these at Super Bowl parties, birthday BBQs, and casual weeknight dinners. Everyone loves them. The combination of salty bacon, savory beef, and melty cheese is just unbeatable.
Lightning Fast
From start to finish, these take about 25-30 minutes. That’s faster than waiting for a pizza delivery. If you’re in a pinch, this is your savior. I’ve made these while helping my kid with homework and still had them ready before the first quarter started.
Budget-Smart
Feeding a crowd usually means spending a fortune. Not with these. Ground beef, bacon, cheese, and rolls are pantry staples (or close to it). You’re feeding 12-15 people for under $20. That’s a steal compared to buying appetizers at the grocery store or ordering catering.
This is my answer to “what’s for dinner?” when I’m tired and don’t want takeout. My family is happy, my friends are happy, and I’m happy because I’m not stressed about cooking. It’s reliable, delicious food that makes everyone smile.
Ingredients You’ll Need
Here’s the best part: you probably have most of this already. I’m particular about three things here—the quality of the beef, the type of rolls, and the cheese—but for the rest, keep it simple. You don’t need fancy gourmet items for this to taste amazing.
For the Burger Patties
Ground beef (1.5 pounds / 680g) — Go for 80/20 lean-to-fat ratio. You want the fat for flavor and juiciness. Lean beef will make these dry, and nobody wants dry sliders. I use regular ground chuck from the store. If you can find grass-fed, even better, but it’s not a dealbreaker.
Bacon (8-10 slices / 200g) — Use thick-cut if you can find it. It holds up better in the slider. Cook it until it’s crispy but not burnt. You want it to crunch, not crumble into dust. I usually cook this in the microwave for speed, but the skillet gives it better flavor. Your call.
Yellow onion (1 medium, finely diced / about 150g) — Don’t skip the onion. It adds sweetness and depth. Finely dice it so it cooks down quickly and distributes evenly. White onions work too, but yellow is sweeter and milder.
Garlic (2 cloves, minced / about 1 tablespoon) — Fresh only. Jarred garlic has a weird metallic taste that really shows up in simple recipes like this. Mince it fine so it blends into the meat.
Worcestershire sauce (1 tablespoon) — This is the secret umami booster. It adds that deep, savory burger flavor without tasting like Worcestershire. I always keep a bottle in my pantry.
Ketchup (1 tablespoon) — Just a tablespoon. It adds a touch of sweetness and tang. Don’t overdo it, or it’ll taste like ketchup burgers. We want subtle.
Yellow mustard (1 teaspoon) — Again, just a teaspoon. It cuts through the richness of the beef and cheese. If you hate mustard, skip it, but I recommend trying it.
Salt and black pepper (1 teaspoon each) — Season the meat well. Don’t be shy with the salt. Undersalted burgers taste bland.
For the Assembly
Hawaiian rolls (1 pack of 12 / 400g) — These are non-negotiable. The sweetness of the rolls balances the savory meat perfectly. If you can’t find Hawaiian rolls, brioche buns work too. Avoid standard white sandwich rolls—they’re too dry and tough.
American cheese slices (12 slices / 120g) — Yes, processed American cheese. It melts better than cheddar or Swiss. You want that gooey, stringy melt. If you’re anti-processed, try a mild cheddar, but the texture won’t be the same. Trust me on this one.
Butter (4 tablespoons / 60g, melted) — For brushing the tops. Adds richness and helps the seasoning stick.
Slider Seasoning — Mix 1 teaspoon garlic powder, 1 teaspoon onion powder, and ½ teaspoon dried parsley. This goes on top before baking for that golden, flavorful crust.
Optional Add-ins — Pickles? Sure. Jalapeños? Why not. I’ve added crispy fried onions for texture before, and it was amazing. Get creative, but don’t overload them. You want the burger flavor to shine.
Equipment Needed
You don’t need fancy equipment for this. Here’s what I actually use.
Large skillet — 12-inch cast iron or stainless steel works best. I prefer cast iron because it holds heat well and gives the meat a nice sear. Non-stick works too, but you might not get that crusty bit.
Baking dish — 9×13 inch. Any oven-safe dish works. Glass or ceramic is fine. I use a Pyrex dish because I can see the bottom if I’m worried about burning.
Small bowl — For mixing the melted butter and seasoning. Any small bowl works.
Pastry brush or spoon — For brushing the butter on top. I use a silicone brush, but a spoon works fine if you’re lazy.
Cutting board and knife — For dicing the onion and bacon. Sharp knife helps, but any knife works.
Measuring spoons — Standard stuff. Dollar store versions work fine.
Aluminum foil — Optional, for covering the sliders while they bake if you’re worried about the tops burning before the cheese melts.
How to Make It: Step-by-Step
Alright, let’s make this! I’m walking you through exactly how I do it, including the little tricks I’ve picked up over time.
Step 1: Prep Your Ingredients (5 minutes)
Before you start cooking, dice your onion, mince your garlic, and cook your bacon. I usually cook the bacon first so it’s done while the beef cooks. Crumble the bacon into small pieces and set aside. Measure out your butter and seasoning mix. Once you start assembling, things move fast, so get everything ready.
Step 2: Cook the Beef (8-10 minutes)
Heat your skillet over medium-high heat. Add the ground beef, diced onion, and minced garlic. Break up the meat with a spatula as it cooks. You want it browned and cooked through, about 8-10 minutes. Drain any excess grease if there’s too much, but leave a little for flavor. Stir in the Worcestershire sauce, ketchup, mustard, salt, and pepper. Mix well and let it simmer for 2 minutes so the flavors meld. Remove from heat and stir in the crumbled bacon. Set aside.
Step 3: Prepare the Rolls (2 minutes)
Keep the Hawaiian rolls connected as a single slab. Slice them in half horizontally, like a sandwich, so you have a top and bottom half. Place the bottom half in your baking dish. It should fit snugly. If your rolls are huge, you might need two dishes, but usually, one pack fits perfectly.
Step 4: Assemble the Sliders (3 minutes)
Distribute the beef mixture evenly over the bottom rolls. Top each slider with a slice of American cheese. Make sure every slider gets cheese—no one wants a cheese-less slider. If you’re adding pickles or jalapeños, add them now.
Step 5: Add the Topping (2 minutes)
Place the top half of the rolls over the sliders. In a small bowl, mix the melted butter with the garlic powder, onion powder, and parsley. Brush this mixture generously over the top of the rolls. Make sure you get into the crevices between the rolls so every bit gets seasoned.
Step 6: Bake (10-12 minutes)
Preheat your oven to 350°F (175°C). Place the baking dish in the oven and bake for 10-12 minutes, or until the cheese is melted and the tops are golden brown. If the tops are browning too fast, cover loosely with foil. You want the cheese gooey and the rolls toasted.
Step 7: Serve
Remove from the oven and let cool for 2-3 minutes. Slice between the rolls to separate the sliders. Serve warm. They’re messy, so grab plenty of napkins. I usually serve these with a side of pickles or a simple green salad to cut the richness.
Total Time: About 25-30 minutes (10 minutes active, 15-20 minutes mostly hands-off)
Expert Tips & Tricks
Here’s everything I’ve learned from making these dozens of times. These tips will save you from my mistakes.
Don’t Overmix the Meat
When cooking the beef, break it up gently. Overworking the meat can make it tough. You want tender, juicy sliders, not meatballs. Cook until just done, then remove from heat.
Crispy Bacon is Key
If your bacon is soft or chewy, it won’t add the right texture. Cook it until it’s crisp. If you’re using the microwave, lay the bacon on a paper towel and microwave for 4-6 minutes, flipping halfway. Check often so it doesn’t burn.
Butter the Tops Well
Don’t skimp on the butter mixture. It’s what gives the rolls that golden, savory crust. Brush it on thick. If you’re worried about running out, melt an extra tablespoon. It’s worth it.
Keep Them Warm
If you’re hosting a party, these are best served warm. If you’re baking them ahead, keep them in the oven at 200°F (95°C) until you’re ready to serve. They’ll stay warm and gooey.
Common Mistakes
Soggy rolls? Don’t overload the sliders with too much meat. A little goes a long way. Also, make sure the meat is drained of excess grease before assembling.
Dry sliders? Use 80/20 beef. Lean beef dries out quickly. And don’t overcook the meat. It’ll continue cooking in the oven.
Burnt tops? Watch the oven closely. Every oven is different. If they’re browning too fast, cover with foil.
Variations & Substitutions
Once you’ve nailed the basic version, here’s how you can mix it up. I’ve tried all of these.
BBQ Bacon Sliders
Swap the ketchup and mustard for BBQ sauce. Brush the tops with BBQ sauce instead of butter. Add coleslaw on top for crunch. This is a crowd favorite.
Spicy Jalapeño Sliders
Add diced jalapeños to the meat mixture. Use pepper jack cheese instead of American. Top with sliced jalapeños after baking. Great for heat lovers.
Mushroom & Swiss Sliders
Sauté sliced mushrooms with the onions. Use Swiss cheese instead of American. Add a little Dijon mustard to the meat. Feels fancier, tastes amazing.
Chicken Slider Version
Use ground chicken instead of beef. Add extra garlic and herbs. Use provolone cheese. Lighter, but still delicious.
Dietary Modifications
Gluten-Free: Use gluten-free Hawaiian-style rolls. Everything else is naturally gluten-free. I’ve used Schär gluten-free rolls, and they work well.
Dairy-Free: Use dairy-free cheese slices and butter substitute. It’s not the same, but it works if you’re avoiding dairy. My lactose-intolerant friend requests this version.
Lower-Carb: Use lettuce wraps instead of rolls. Or use low-carb buns. The meat mixture stays the same. Not as indulgent, but still tasty.
Serving & Storage
I usually serve these straight from the baking dish at the party—it looks rustic and stays warm. But here are other ways I’ve enjoyed them.
Side Dishes
These are heavy, so pair them with something light. A simple green salad with vinaigrette works great. Or roasted vegetables. Pickles are a classic pairing. I also like serving them with grilled bacon-wrapped corn for a summer vibe.
Wine Pairing
Not a wine expert, but my wine-snob friend says a crisp Pinot Grigio or a light Chardonnay works well. For beer lovers, a lager or IPA complements the savory flavors.
Storage
Refrigerator: Store leftovers in an airtight container for up to 3 days. The rolls might get a bit soft, but they’re still good.
Reheating: Best method: Reheat in the oven at 350°F for 10 minutes. This keeps the rolls crispy. Microwave works too, but the rolls will get chewy. If you microwave, do it in short bursts.
Freezing: These don’t freeze well. The rolls get soggy when thawed. Make them fresh or store in the fridge for up to 3 days.
Nutrition Information
I’m not a nutritionist, but here’s the breakdown if you’re tracking. Keep in mind, this is comfort food, so it’s not a diet recipe.
Per Slider (based on 12 sliders):
- Calories: 320
- Protein: 18g
- Carbs: 24g
- Fiber: 1g
- Sugar: 6g
- Fat: 16g
- Saturated Fat: 7g
- Cholesterol: 55mg
- Sodium: 680mg
What’s Good:
- Decent protein from beef and cheese
- Calcium from the cheese
- Can add vegetables to boost nutrition
What to Know:
- Higher in calories from cheese and butter
- Contains dairy and gluten
- Moderate sodium (use low-sodium broth if adding any)
My Take:
Look, this is comfort food with cheese and bacon. It’s not a diet recipe. But it’s way better than takeout, costs less, and I know exactly what’s in it. When I want to make it lighter, I use lean beef and less cheese. But usually? I just eat a reasonable portion and enjoy it.
Final Thoughts
So that’s my go-to Game Day Bacon Cheeseburger Sliders! I’ve probably talked your ear off at this point, but when you make a recipe this often, you have a lot to say about it. This has saved weeknight dinners more times than I can count. It’s my answer to “what’s for dinner?” when I’m tired, don’t want takeout, and still want something that tastes really good.
My kids are happy, my husband’s happy, and I’m happy because I’m not stressed about cooking. Make it yours! Try different add-ins, swap in your favorite vegetables, adjust the spices. The best recipes are the ones you adapt to your family’s tastes.
If you make this, drop a comment and let me know what you think! I love hearing how recipes turn out in your kitchen. And if something doesn’t work, tell me that too—I’m here to help troubleshoot. Happy cooking! And I hope your kitchen smells half as good as mine does right now.
Frequently Asked Questions
Can I use ground turkey instead of beef?
You can, but the flavor will be different. Turkey is leaner, so the sliders might be drier. I recommend adding extra moisture, like a little olive oil or broth, to the meat. And use turkey-friendly cheese if you want to keep it dairy-free. It’s not the same as beef, but it’s still good.
Why did my sliders turn out dry?
Usually means you used lean beef or overcooked the meat. Use 80/20 beef, and don’t cook the meat too long before assembling. It’ll continue cooking in the oven. Also, don’t skip the butter topping—it adds moisture.
Can I make these ahead of time?
Sort of. Assemble them ahead of time and store in the fridge for up to 24 hours. Bake them right before serving. If you bake them ahead, reheat them in the oven to keep the rolls crispy. I do this all the time for parties.
Can I freeze these?
Honestly, these don’t freeze well. The rolls get soggy and the cheese separates. Make them fresh or store in the fridge for up to 3 days. If you must freeze, freeze the meat mixture separately, then assemble and bake fresh.
What kind of cheese is best?
American cheese melts best. It’s smooth and gooey. If you hate processed cheese, try a mild cheddar or provolone. But the texture won’t be the same. Swiss cheese is good too, but it doesn’t melt as smoothly.
Can I double this recipe?
Absolutely! Double everything and use a larger baking dish. The cooking time stays the same. I do this when I’m feeding a crowd. Just make sure your oven has room for the dish.
Do I need to drain the grease from the beef?
It’s recommended. Excess grease can make the rolls soggy. Drain most of it, but leave a little for flavor. If you’re using lean beef, there might not be much grease to drain.
Pin This Recipe!
Game Day Bacon Cheeseburger Sliders
- Total Time: 30 minutes
- Yield: 12 servings 1x
Description
These Game Day Bacon Cheeseburger Sliders are the ultimate 5 PM win: messy, indulgent, and ridiculously easy to make. With ground beef, crispy bacon, melty American cheese, and sweet Hawaiian rolls, they are a crowd-pleasing finger food that comes together in under 30 minutes.
Ingredients
- 1.5 pounds ground beef (80/20 lean-to-fat ratio)
- 8–10 slices thick-cut bacon
- 1 medium yellow onion, finely diced
- 2 cloves garlic, minced
- 1 tablespoon Worcestershire sauce
- 1 tablespoon ketchup
- 1 teaspoon yellow mustard
- 1 teaspoon salt
- 1 teaspoon black pepper
- 1 pack (12) Hawaiian rolls
- 12 slices American cheese
- 4 tablespoons butter, melted
- 1 teaspoon garlic powder
- 1 teaspoon onion powder
- 1/2 teaspoon dried parsley
Instructions
- Preheat oven to 350°F (175°C).
- Cook the bacon until crispy, then crumble into small pieces and set aside.
- In a large skillet over medium-high heat, cook the ground beef, diced onion, and minced garlic. Break up the meat with a spatula until browned and cooked through (8-10 minutes).
- Drain excess grease if necessary, leaving a little for flavor. Stir in Worcestershire sauce, ketchup, mustard, salt, and pepper. Simmer for 2 minutes.
- Remove from heat and stir in the crumbled bacon.
- Keep the Hawaiian rolls connected as a single slab. Slice them in half horizontally. Place the bottom half in a 9×13 inch baking dish.
- Distribute the beef mixture evenly over the bottom rolls. Top each slider with a slice of American cheese.
- Place the top half of the rolls over the sliders.
- In a small bowl, mix the melted butter with garlic powder, onion powder, and dried parsley. Brush this mixture generously over the top of the rolls.
- Bake for 10-12 minutes until the cheese is melted and the tops are golden brown. Cover loosely with foil if tops are browning too fast.
- Let cool for 2-3 minutes before slicing between the rolls to separate. Serve warm.
Notes
Use 80/20 beef for juiciness; lean beef will make them dry. Cook bacon until crisp for texture. Do not overload sliders with meat to prevent soggy rolls. If baking ahead, keep warm in oven at 200°F. These do not freeze well; store leftovers in the fridge for up to 3 days.
- Prep Time: 10 minutes
- Cook Time: 20 minutes
- Category: Appetizer
- Cuisine: American
Nutrition
- Serving Size: 1 slider
- Calories: 320
- Sugar: 6
- Sodium: 680
- Fat: 16
- Saturated Fat: 7
- Carbohydrates: 24
- Fiber: 1
- Protein: 18
Keywords: game day food, sliders, bacon cheeseburger, party appetizers, easy dinner, comfort food, football snacks, 5pm dinner