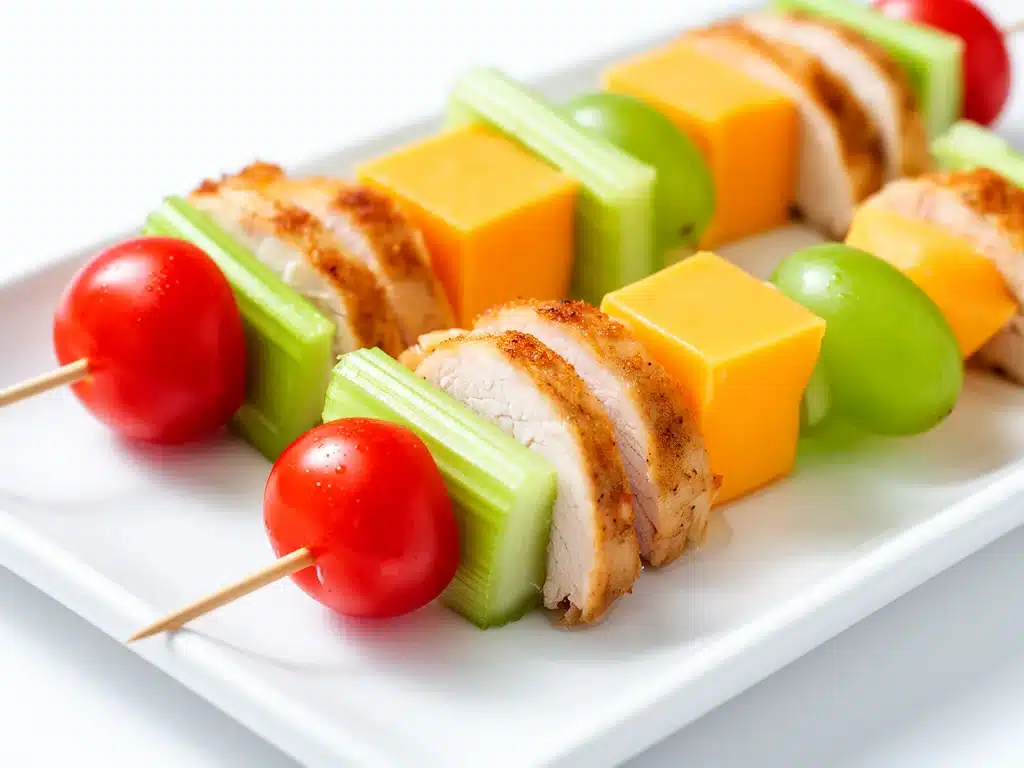
One chaotic September morning last year, I found myself scrambling not just to get my kids out the door on time, but also trying to pack lunch that wouldn’t get tossed in the trash by noon. I was done with soggy sandwiches and boring snacks that neither my kids nor I wanted to deal with. That’s when I threw together these Back-to-School Turkey Cheddar Lunch Kabobs on a whim. Honestly? They were supposed to be a quick fix but turned into a game-changer for our entire lunch routine.
Since then, I’ve made these kabobs over and over—sometimes the night before, sometimes early the morning of, and they never disappoint. They’re colorful, balanced, and best of all: the kids actually eat them without complaint, which feels like a small miracle. Plus, the make-ahead prep means less stress when mornings are already crazy. So basically, these kabobs are my secret weapon for easy, nutritious snacks that feel way more special than a sandwich.
Why You’ll Love This Recipe
These Back-to-School Turkey Cheddar Lunch Kabobs have totally transformed how I pack lunches and snacks. Here’s why they might just become your new favorite go-to:
- Simple Make-Ahead Prep — I prep everything the night before or even on Sunday. Kabobs assembled in minutes, ready to grab and go. Seriously, it saves me so much time in the mornings.
- Kid-Approved — My picky eaters love them because they’re fun to eat and full of familiar flavors. No more lunchtime battles over mystery sandwiches.
- Balanced Nutrition — With lean turkey, sharp cheddar, fresh veggies, and even some fruit, these kabobs cover protein, healthy fats, and fiber. They keep energy steady through the afternoon slump.
- Customizable — Swap out turkey for ham or chicken, cheddar for mozzarella, or add olives and cucumbers. I’ll share more variations later.
- Perfect Portion Control — Each kabob is a mini-meal, so it’s easy to pack just the right amount without overdoing it.
For me, these kabobs are more than just lunch—they’re a little moment of calm in the morning rush, and a snack that actually hits the spot. If you’ve ever felt the lunchbox struggle, you’ll get why I keep making these.
Ingredients You’ll Need
Here’s the best part: most of these ingredients are probably already in your fridge or pantry. I’m picky about freshness when it comes to the turkey and cheese, so I’ll break down why each ingredient matters and how to get the best results.
- Deli turkey slices (8 ounces / 225g) — Go for nitrate-free or organic if you can. I fold or cut the slices into bite-sized pieces so they fit perfectly on the skewers.
- Sharp cheddar cheese
- Grape tomatoes (1 cup / 150g) — Sweet and juicy, they add a pop of color and freshness. I always pick small ones that don’t burst easily.
- Seedless cucumber
- Red bell pepper
- Fresh green grapes
- Wooden skewers
Optional but recommended:
- Hummus or ranch dip
- Baby carrots or snap peas
Equipment Needed
You don’t need anything fancy here. Just some basics that probably live in your kitchen already.
- Cutting board — For chopping veggies and cheese.
- Sharp knife
- Measuring cups
- Mixing bowls
- Wooden skewers
- Lunch containers or snack boxes
How to Make It: Step-by-Step

Alright, here’s how I make these Back-to-School Turkey Cheddar Lunch Kabobs come together, with tricks I’ve picked up so you don’t have to guess.
Step 1: Prep Your Ingredients (10 minutes)
Wash your grape tomatoes, grapes, cucumber, and red bell pepper. Slice the cucumber into thick rounds and the bell pepper into bite-sized squares. Cube the cheddar cheese into similar-sized pieces (about ¾ inch) so everything looks balanced on the skewers. Fold or cut the turkey slices into bite-sized chunks. Having everything prepped and in bowls makes assembly quick and painless.
Step 2: Assemble the Kabobs (10-15 minutes)
Grab your soaked wooden skewers and start threading the ingredients in a pattern. I usually go grape tomato, turkey, cheese, cucumber, red pepper, grape, and repeat until the skewer is full but not overcrowded. This way, every bite has a little bit of everything.
If you’re making multiple kabobs, assemble them all on a tray or plate lined with parchment paper. Cover with plastic wrap and pop them in the fridge if you’re prepping ahead.
Step 3: Store or Serve
If you’re prepping ahead, these kabobs keep really well in the fridge for up to 2 days. I wrap them tightly or place in airtight containers to keep everything fresh. When it’s lunchtime, just grab and go! If you want to add a little dip, pack a small container of hummus or ranch on the side.
Bonus Step: Warm or Grill (Optional)
If you prefer, you can warm the kabobs slightly by placing them on a grill pan or under a broiler for 2–3 minutes. Just be sure to soak the skewers first and watch carefully—they heat fast and you don’t want burnt kabobs.
Expert Tips & Tricks
- Soak Your Skewers — This little step keeps your wooden sticks from burning if you want to heat the kabobs.
- Cut Evenly — Uniform pieces make the kabobs look prettier and help with even bites. Plus, kids notice when things look “right.”
- Make It the Night Before — I prep all ingredients and assemble kabobs the night before school. It saves precious morning minutes and the kabobs stay fresh.
- Use Fresh, Quality Ingredients — Sharp cheddar and good deli turkey make a huge flavor difference. I buy from the deli counter when possible.
- Mix Up the Veggies — Feel free to swap in baby carrots, snap peas, or even olives to keep things interesting.
- Dip It — Adding a side of hummus or ranch dressing increases the fun factor and boosts flavor.
- Keep It Cold — Pack the kabobs in insulated lunch boxes with ice packs to keep everything crisp and fresh.
Variations & Substitutions
Once you’ve nailed the basic kabobs, feel free to mix things up—I’ve tested plenty of variations that work just as well.
- Swap the Turkey — Use ham, chicken breast, or even smoked turkey for a flavor twist.
- Cheese Options — Try mozzarella, Colby Jack, or pepper jack for a different cheese profile.
- Vegetarian Version — Skip the meat and add more veggies like cherry tomatoes, cucumber, olives, and cheese cubes.
- Fruit Swaps — Substitute grapes with apple chunks, strawberries, or melon balls for seasonal variety.
- Gluten-Free — Naturally gluten-free as is, but always double-check dips or processed meats for hidden gluten.
- Make It Mini — Use shorter skewers and smaller pieces for toddler-friendly bites.
Serving & Storage
I usually pack these kabobs straight into lunchboxes or snack containers. If you’re serving at home or a party, arrange them on a platter with little bowls of hummus or ranch for dipping. They’re a colorful, inviting snack that’s perfect for back-to-school afternoons or even a casual get-together.
For storage, keep the kabobs in airtight containers in the fridge for up to 2 days. The veggies stay crisp and the cheese and turkey stay fresh. If you’re packing lunches, I recommend prepping the night before for the best taste and texture.
Leftovers? These kabobs don’t freeze well because of the fresh veggies and cheese, so plan to eat within a couple of days. If you want to re-energize them, a quick dip in your favorite dressing can help bring them back to life.
Nutrition Information
| Per Serving (1 kabob, makes 6) | Amount |
|---|---|
| Calories | 180 |
| Protein | 12g |
| Carbohydrates | 8g |
| Fiber | 1.5g |
| Sugar | 5g |
| Fat | 11g |
| Saturated Fat | 6g |
| Sodium | 350mg |
| Calcium | 180mg |
This snack packs a good hit of protein and calcium thanks to the turkey and cheddar. It’s balanced with fresh veggies and fruit for fiber and natural sugars. Yes, there’s fat from the cheese, but it’s the kind that keeps you full and satisfied through the afternoon slump. If you want to lighten it up, swap sharp cheddar for a milder, lower-fat cheese.
Final Thoughts
So that’s my simple, reliable recipe for Back-to-School Turkey Cheddar Lunch Kabobs with Simple Make-Ahead Prep. I’ve probably said this a few times by now, but these kabobs really make my mornings easier and my kids’ lunches more fun. If you want a snack or lunch that’s quick, colorful, and actually gets eaten, this is it.
Feel free to put your own spin on it—try different cheeses, swap in your favorite veggies, or add a sprinkle of herbs. The best part of this recipe is how flexible it is for your family’s tastes and schedule.
If you decide to make these, drop a comment below and tell me how it went! I’d love to hear your twists or any questions you have. Happy packing—and may your mornings be a little less hectic!
Frequently Asked Questions
Q: Can I use other types of meat instead of turkey?
A: Absolutely! Ham, grilled chicken, or smoked turkey work great here. Just make sure to cut them into bite-sized pieces for easy kabob assembly.
Q: How long can I make these kabobs ahead of time?
A: I recommend assembling them up to 2 days in advance. Keep them covered tightly in the fridge to maintain freshness. Beyond that, the veggies start to lose their crunch.
Q: Can these kabobs be frozen?
A: I wouldn’t suggest freezing since the fresh veggies and cheese don’t hold up well. It’s best to make them fresh or store in the fridge short-term.
Q: What if my kids don’t like raw veggies?
A: You can swap raw veggies for cooked or roasted options like sweet peppers or even steamed broccoli florets. Sometimes changing the texture helps kids warm up to them.
Q: Any tips for packing these in lunchboxes?
A: Use a container with compartments or wrap the kabobs gently in parchment paper to keep them from rolling around. Including a small ice pack keeps everything fresh until lunchtime.
Q: Can I make these kabobs vegan or dairy-free?
A: For a vegan twist, swap turkey for marinated tofu or chickpeas and use dairy-free cheese cubes. Fresh veggies and fruit stay the same. It’s a tasty, plant-based snack option.
Q: What dips go well with these kabobs?
A: Hummus, ranch, or honey mustard are all favorites. I like packing little dipping containers so the kids can customize each bite.
And if you’re ever in the mood for another easy-to-make, tasty snack, these crispy garlic chicken bites are a personal favorite that pair well with simple sides. Or for more lunchbox inspiration, the healthy lunchbox ideas collection on the blog always gets great feedback.
Pin This Recipe!


Back-to-School Turkey Cheddar Lunch Kabobs
- Total Time: 10-15 minutes
- Yield: 6 kabobs 1x
Description
These colorful and balanced turkey cheddar lunch kabobs are an easy make-ahead snack that kids love. Perfect for quick, nutritious lunches or snacks that keep mornings stress-free.
Ingredients
- 8 ounces deli turkey slices (nitrate-free or organic preferred), folded or cut into bite-sized pieces
- 8 ounces sharp cheddar cheese, cubed (about ¾ inch pieces)
- 1 cup grape tomatoes (about 150g), washed
- 1 medium seedless cucumber, sliced into thick rounds
- 1 medium red bell pepper, cut into bite-sized squares
- 1 cup fresh green grapes (about 150g), washed
- 6-inch wooden skewers, soaked in water for 15 minutes before use
- Optional: hummus or ranch dip for serving
- Optional: baby carrots or snap peas for extra crunch
Instructions
- Prep your ingredients: Wash grape tomatoes, grapes, cucumber, and red bell pepper. Slice cucumber into thick rounds and bell pepper into bite-sized squares. Cube cheddar cheese into ¾ inch pieces. Fold or cut turkey slices into bite-sized chunks.
- Assemble the kabobs: Thread ingredients onto soaked wooden skewers in a pattern such as grape tomato, turkey, cheese, cucumber, red pepper, grape, and repeat until the skewer is full but not overcrowded.
- If making multiple kabobs, place them on a tray or plate lined with parchment paper. Cover with plastic wrap and refrigerate if prepping ahead.
- Store or serve: Keep kabobs in airtight containers in the fridge for up to 2 days. Serve cold or with a side of hummus or ranch dip.
- Optional warming: Warm kabobs on a grill pan or under a broiler for 2–3 minutes, ensuring skewers are soaked to prevent burning.
Notes
[‘Soak wooden skewers for 15 minutes before use to prevent burning if warming or grilling.’, ‘Cut ingredients into uniform pieces for even bites and better presentation.’, ‘Assemble kabobs the night before to save time in the morning and keep fresh.’, ‘Use fresh, quality deli turkey and sharp cheddar for best flavor.’, ‘Customize with different meats, cheeses, veggies, or fruits as desired.’, ‘Pack kabobs in insulated lunch boxes with ice packs to keep fresh.’, ‘Kabobs do not freeze well due to fresh veggies and cheese.’]
- Prep Time: 10 minutes
- Cook Time: 0 minutes
- Category: Snack
- Cuisine: American
Nutrition
- Serving Size: 1 kabob
- Calories: 180
- Sugar: 5
- Sodium: 350
- Fat: 11
- Saturated Fat: 6
- Carbohydrates: 8
- Fiber: 1.5
- Protein: 12
Keywords: turkey kabobs, lunch kabobs, back-to-school snacks, make-ahead snacks, kid-friendly lunch, turkey cheddar kabobs, healthy snacks